Full Page Screenshot in Chrome Without an Extension
Take a full page screenshot in Chrome with the DevTools command, the command line or a Console snippet. Tested limits, lazy images and fixed headers.
Chrome can take a full page screenshot without an extension. The command is in DevTools:
- Open the page and press
Cmd+Option+I(macOS) orCtrl+Shift+I(Windows, Linux) to open DevTools. - Press
Cmd+Shift+PorCtrl+Shift+Pto open the Command Menu. - Type
full sizeand choose Capture full size screenshot.
Chrome saves a PNG of the whole page to your downloads folder. On many pages that is all you need. On long pages, pages with lazy images and pages with a fixed header, the result can be wrong without any warning. This guide shows what we measured and how to prepare the page so the capture is right. It is part of our guide to full page screenshots with every tool.
Tested on 2026-10-15 with Google Chrome 155.0.8059.40 on macOS 27.0.1. We read what the command does in the DevTools frontend source (
chrome-devtools-frontend1.0.1717709), then sent the same protocol call from a script so we could measure it. We did not repeat the measurements by clicking through the DevTools UI in a headed window.
The other screenshot commands
Type screenshot in the Command Menu to see all four:
| Command | What you get |
|---|---|
| Capture full size screenshot | The whole scrollable page |
| Capture screenshot | The visible part of the page only |
| Capture area screenshot | A rectangle you drag with the mouse |
| Capture node screenshot | One element; select it in the Elements panel first |
Capture node screenshot is the best choice when you need one long part of a page, for example an article body without the site footer. It avoids most of the problems below.
What the command does
In the DevTools source, "Capture full size screenshot" sends one Chrome DevTools Protocol command:
{ "method": "Page.captureScreenshot",
  "params": { "format": "png", "quality": 100, "fromSurface": true, "captureBeyondViewport": true } }
captureBeyondViewport tells Chrome to draw the parts of the page outside the window as well. Chrome does not scroll the page to do this. That one fact explains the three problems in the next sections.
Problem 1: very long pages repeat their top
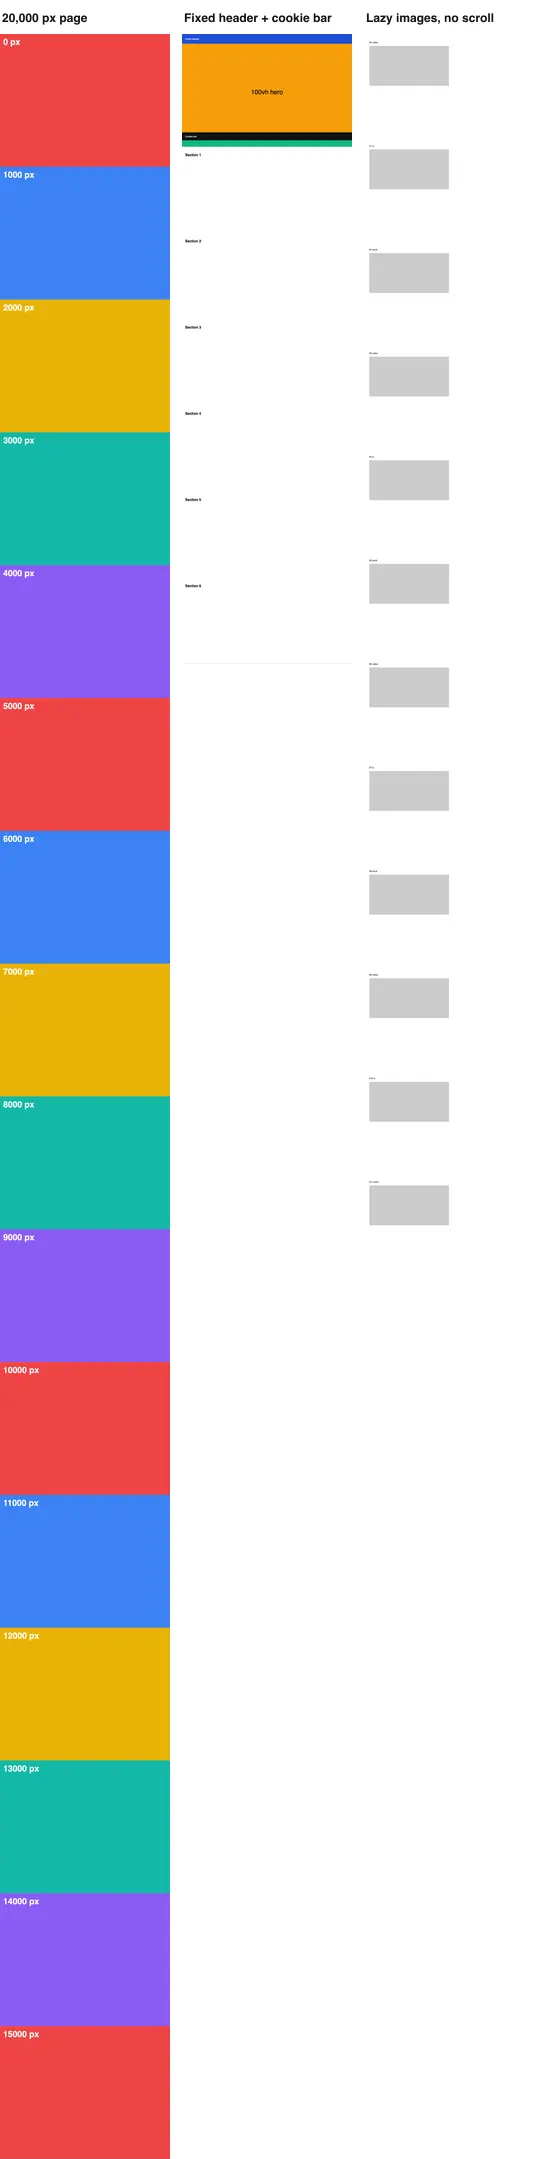
We built pages with 1,000 px colored bands and a magenta END band at the bottom, then sent the DevTools call:
| Page height | Output size | Content |
|---|---|---|
| 8,000 px | 1280 x 8,000 | Correct |
| 16,000 px | 1280 x 16,000 | Correct |
| 16,500 px | 1280 x 16,500 | Correct to 16,384 px, then the top of the page again |
| 20,000 px | 1280 x 20,000 | Correct to 16,384 px, then the top of the page again |
The file has the right size, so nothing tells you it is wrong. The limit counts device pixels. On a Retina Mac, Chrome draws at a device pixel ratio of 2, so expect the limit on a page of about 8,192 CSS px (our 2x Puppeteer test repeated content on an 8,500 px page). We saw the same behavior from Puppeteer and Selenium with full Chrome; the full page guide has the table.
What to do:
- Use Capture node screenshot on the part you need.
- Zoom out with
Cmd+-before the capture. At 50% zoom, the same page uses half the pixels. - Use Firefox, whose full-page capture went to 65,535 px in our tests. See Firefox full page screenshots.
Problem 2: lazy images stay blank
Because Chrome does not scroll, images that load on scroll never start. On our lazy page the DevTools call captured 0 of 20 images, whether they used loading="lazy" or an IntersectionObserver.
The fix is to scroll the page before the capture. You can do that with the mouse, but on long pages this Console snippet is faster. Open the Console tab, paste it and press Enter. The Console accepts top-level await.
// 1. Scroll one screen at a time so lazy images start loading.
for (let y = 0; y < document.documentElement.scrollHeight; y += innerHeight) {
  scrollTo(0, y);
  await new Promise((r) => setTimeout(r, 250));
}
scrollTo(0, 0);
// 2. Wait for the images that started loading.
await Promise.all([...document.images]
  .filter((img) => img.getAttribute('src') && !img.complete)
  .map((img) => img.decode().catch(() => {})));
// 3. Pin fixed bars to the top of the page and drop the ones at the bottom.
for (const el of document.querySelectorAll('body *')) {
  const { position } = getComputedStyle(el);
  if (position === 'fixed') {
    const top = el.getBoundingClientRect().top;
    el.style.setProperty(top > innerHeight / 2 ? 'display' : 'position',
      top > innerHeight / 2 ? 'none' : 'absolute', 'important');
  } else if (position === 'sticky') {
    el.style.setProperty('position', 'static', 'important');
  }
}
'ready for Capture full size screenshot';
When the Console prints 'ready for Capture full size screenshot', run the command. With the snippet, the same call captured 20 of 20 images on our lazy page, where every image took 800 ms to arrive. The changes stay until you reload the page. The lazy image guide explains why a scroll without a wait is not enough.
Problem 3: fixed headers and cookie bars
A position: fixed element is drawn once, at its place in the first screen. In our test the header was correct at the top, but the cookie bar fixed to the bottom of the window was drawn across the content at 740 px, where the first screen ended. Step 3 of the snippet pins top bars to the page and removes bottom bars. If it removes something you need, delete that part of the snippet and hide only the element you want with the Elements panel (right-click the node, Hide element). The sticky header guide covers 100vh heroes too.
Mobile layouts
To capture the phone layout, turn on device emulation first with Cmd+Shift+M or Ctrl+Shift+M, pick a device, then run Capture full size screenshot. The device toolbar menu (three dots) also has the same command. The output uses the device's pixel ratio, so by the same arithmetic an iPhone profile at 3x reaches 16,384 device pixels on a page of about 5,460 CSS px. We did not test that case.
From the command line
Chrome can also write a screenshot without a window:
"/Applications/Google Chrome.app/Contents/MacOS/Google Chrome" --headless \
  --screenshot=page.png --window-size=1280,20000 --hide-scrollbars https://example.com
This captures a window of exactly the height you give, so you need the page height in advance. Extra height is white space, and a 100vh section grows to fill the window. On the other hand it did not repeat content: our 20,000 px page came out correct. Use chrome.exe on Windows and google-chrome on Linux.
When the manual way is not enough
| Situation | Better option |
|---|---|
| You capture the same pages every week | A script: Puppeteer or Playwright |
| Pages longer than about 16,000 px | Firefox, or a script that captures in parts |
| Hundreds of URLs, or captures from a server | A screenshot API |
With RenderScreenshot the scroll for lazy images is part of the full_page preset, and page.remove drops a cookie bar in the same request:
curl -G "https://api.renderscreenshot.com/v1/screenshot" \
  -H "Authorization: Bearer $RS_API_KEY" \
  --data-urlencode "url=https://example.com" \
  --data-urlencode "preset=full_page" \
  --data-urlencode "remove=#cookie-banner" \
  -o full-page.png
The full-page API guide lists the scroll parameters and their limits. You can sign up for a free key to try it.
Troubleshooting
| Symptom | Cause | Fix |
|---|---|---|
| "Capture full size screenshot" is not in the list | You typed in the file search, not the Command Menu | Press Cmd+Shift+P / Ctrl+Shift+P with DevTools focused |
| Bottom of the image shows the top of the page | 16,384 device pixel limit | Node screenshot, zoom out, or Firefox |
| Grey boxes instead of images | Lazy loading | Run the Console snippet first |
| Cookie bar across the middle | Fixed bottom bar drawn at the end of the first screen | Snippet step 3, or hide the element |
| Image is twice as tall as expected in pixels | Device pixel ratio 2 | Expected on Retina screens; resize the PNG if needed |
| Capture shows a phone frame | Device frame is on in the device toolbar | Turn off Show device frame |
Related in this topic
- Full Page Screenshots: Every Method Tested on One Page How to take a full page screenshot with DevTools, Puppeteer, Playwright, Selenium or an API. Each method tested on one 20,000 px page, with times and failures.
- Screenshot Lazy-Loaded Images: 5 Strategies Measured Why full page screenshots miss lazy-loaded images, and which scroll strategy fixes it. Five strategies measured in Chromium, Firefox and WebKit, with code.
- Full Page Screenshot in Firefox: Menu, Console and CLI Take a full page screenshot in Firefox with the built-in screenshot tool, the :screenshot command or the command line. Height limits measured, plus fixes.
- Full Page Screenshot in Safari on Mac and iPhone Take a full page screenshot in Safari: Web Inspector on Mac, Export as PDF, and Full Page on iPhone. WebKit limits measured, lazy images and fixed bars.
- Sticky Headers in Full Page Screenshots: 4 Bugs, 1 Fix Why full page screenshots repeat sticky headers, stretch 100vh heroes and put cookie bars mid-page. Each bug reproduced per tool, with a tested CSS fix.
- Best Full Page Screenshot Extensions for Chrome (2026) The best full page screenshot extensions for Chrome compared with built-in tools, plus a free test page and five checks to score any extension yourself.