HTML to image means rendering a piece of HTML and CSS, usually a template filled with data, into a raster image file such as PNG, JPEG or WebP, so the result can be used where HTML cannot: social cards, emails, chat previews, certificates and documents.
The idea is simple: design with the tools you already know, and get a picture out. The differences lie in what does the rendering. This entry is part of the screenshot and rendering glossary.
A plain explanation
Many places on the internet accept only images. An og:image must be a picture file. Email clients strip most CSS. A Slack preview shows a thumbnail. HTML to image lets you build that picture as a web page, with layout, fonts and data from your app, and then convert it.
template + data ──▶ HTML string ──▶ renderer ──▶ pixels ──▶ PNG / JPEG / WebP
 (escape input)      (full doc)     (browser,      (viewport    (encode, then
                                    DOM redraw     or element)   store or serve)
                                    or SVG)
Three approaches
| Approach | Examples | CSS support | Runs where | Main limits |
|---|---|---|---|---|
| Headless browser screenshot | Puppeteer, Playwright, screenshot APIs | Everything Chrome supports | Server or API | Needs a browser process; slower to start |
| DOM redraw in the visitor's browser | html2canvas, html-to-image, dom-to-image |
Partial; reimplemented or via SVG foreignObject |
Client side | Cross-origin images taint the canvas; fonts must be inlined |
| HTML/JSX to SVG converter | Satori | Flexbox subset, no grid, limited selectors | Server or edge, no browser | You write to its subset, not to the web platform |
Pick by where the input comes from and how faithful the output must be. For a template you control and need fast at the edge, a converter can be enough. To capture what a real browser shows, including JavaScript output, web fonts and modern CSS, you need a browser engine.
A card rendered from a template
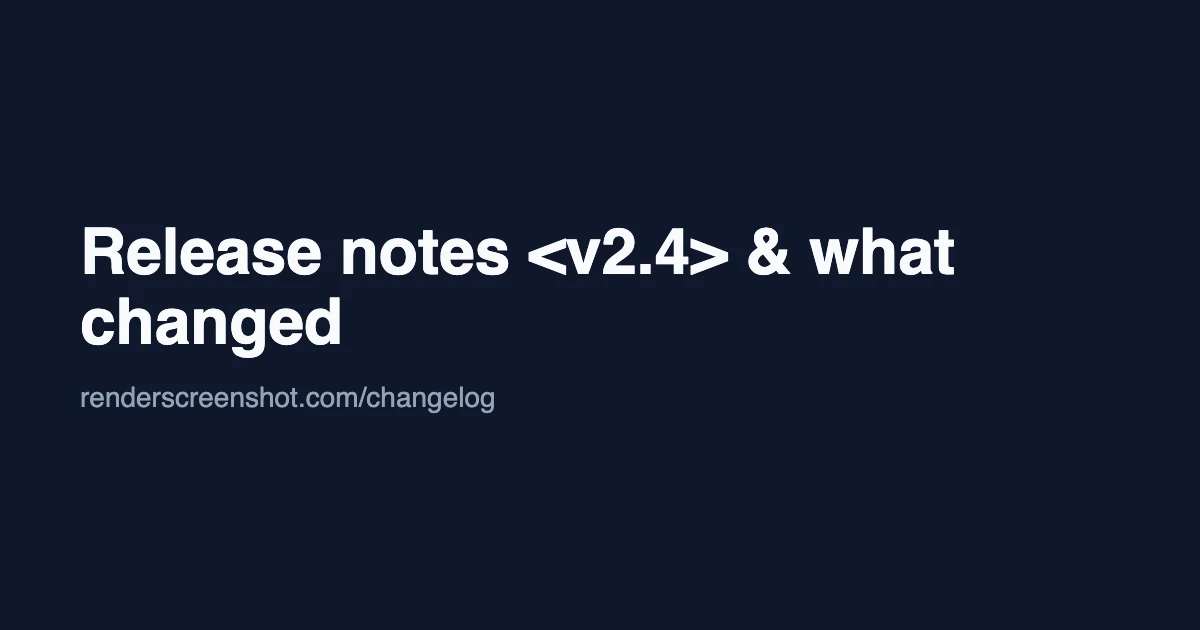
<, > and &; escaping makes them print as text instead of breaking the markup.How it works technically, in a browser engine
- Load the HTML. From a string with
setContent, or from a URL. Strings have no address, so relative asset paths need a base URL. - Wait. For
load, for web fonts (document.fonts.ready), and for any script that draws into the page. - Choose the area. The viewport is the canvas, so set it to the image size. Or capture one element and let its box decide the size.
- Encode. PNG is lossless and supports transparency. JPEG and WebP are smaller for photos and gradients.
- Escape input. Any user text placed into the HTML must be escaped. Unescaped input can break the layout or run script inside your renderer.
The setting in Puppeteer, Playwright and RenderScreenshot
Puppeteer: a full-size card from a template. The viewport equals the card size.
import puppeteer from 'puppeteer'; // Escape anything that comes from users before it goes into markup. const esc = (s) => String(s).replace(/[&<>"']/g, (c) => ({ '&': '&', '<': '<', '>': '>', '"': '"', "'": ''' })[c]); const title = 'Release notes <v2.4> & what changed'; const html = `<!doctype html><html><head><meta charset="utf-8"><style> body{margin:0;width:1200px;height:630px;display:flex;flex-direction:column;justify-content:center; padding:0 80px;box-sizing:border-box;background:#0f172a;color:#f8fafc;font-family:Helvetica,Arial,sans-serif} h1{font-size:64px;line-height:1.1;margin:0 0 24px} p{font-size:28px;color:#94a3b8;margin:0} </style></head><body><h1>${esc(title)}</h1><p>renderscreenshot.com/changelog</p></body></html>`; const browser = await puppeteer.launch(); try { const page = await browser.newPage(); await page.setViewport({ width: 1200, height: 630 }); await page.setContent(html, { waitUntil: 'load' }); await page.evaluate(() => document.fonts.ready); await page.screenshot({ path: 'out/h2i-card.png' }); } finally { await browser.close(); }
Playwright: an element at 2x with a transparent background. The output is the element's size, here a 330 x 86 RGBA PNG from a 165 x 43 badge.
import { chromium } from 'playwright';

// Element capture: the image is exactly the size of the element, no viewport math.
const browser = await chromium.launch();
try {
  const page = await browser.newPage({ deviceScaleFactor: 2 });
  await page.setContent(`<!doctype html><meta charset="utf-8">
    <div id="badge" style="display:inline-block;padding:10px 18px;border-radius:999px;
      background:#16a34a;color:#fff;font:600 20px Helvetica,Arial,sans-serif">build passing</div>`);
  await page.locator('#badge').screenshot({ path: 'out/h2i-badge.png', omitBackground: true });
} finally {
  await browser.close();
}
RenderScreenshot: send the HTML instead of a URL. In the Node SDK, TakeOptions.html() replaces TakeOptions.url(); everything else, such as size, scale and format, works the same.
import { writeFile } from 'node:fs/promises';
import { Client, TakeOptions } from 'renderscreenshot';

const client = new Client(process.env.RS_API_KEY);
const image = await client.take(
  TakeOptions.html(html).width(1200).height(630).format('png') // html: the escaped template above
);
await writeFile('card.png', image);
For POST bodies, the fields are html, html_base_url, viewport and output. output.transparent gives a transparent PNG or WebP. The HTML to image guide covers fonts, payload size and escaping in detail, and the HTML to image API page covers the use cases.
Tested on 2026-10-15 with Node 22.18, Puppeteer 24.43.1 (headless shell, Chrome 148) and Playwright 1.64.1 (Chromium 156). The RenderScreenshot snippet follows the SDK docs and was not run for this page.
Common mistakes
- Leaving the viewport at the default. The card is drawn in a 1280 x 800 window and cropped wrong. Set the viewport to the image size, or capture an element.
- No escaping. A title with
<or&breaks the markup, and user input can inject script. - Capturing before fonts load. The first render often uses the fallback font. Wait for fonts, as in the Puppeteer listing.
- Choosing a DOM-redraw library for third-party content. Cross-origin images and unsupported CSS fail silently in the visitor's browser.
Related terms
- HTML base URL: why relative image paths break in rendered strings.
- OG image: the most common output of HTML to image.
- Satori: the converter approach in detail.
To render your own templates without running a browser, get a free API key.